Experiencing the E298 ‘No power’ code on your Nest thermostat? No need to worry – we’re here to assist. In this guide, we’ll walk you through the steps to troubleshoot and resolve the E298 Nest ‘No power’ code.
Various issues, such as incorrect thermostat wiring, a lack of C-wire connection, a tripped circuit breaker, or a blown fuse, can trigger the E298 error on Nest thermostats. These issues may interrupt the power supply to the thermostat, leading to the appearance of the E298 code.
Encountering the E298 Nest ‘No Power’ code can be frustrating, but the good news is there are solutions at your fingertips. In this guide, we’ll walk you through simple and effective steps to resolve the issue and get your Nest thermostat back up and running. Discover how to tackle the E298 code with ease and ensure your thermostat receives the power it needs for optimal performance.
Causes Of E298 Code On Nest Thermostat
Below is a table outlining potential causes of the E298 code and possible solutions:
| Causes of E298 Code on Nest Thermostat | Possible Solutions |
| 1. Wiring Issues | – Check thermostat wiring for loose connections or damage. |
| – Ensure wires are properly seated in their respective terminals. | |
| – Verify compatibility of thermostat wiring with Nest system. |
| – Repair or replace damaged wires. | |
| 2. Power Supply Problems | – Confirm the thermostat is receiving power. |
| – Check for tripped circuit breakers or blown fuses. |
| – Verify the compatibility of the power source with Nest. | |
| 3. Network Connection Issues | – Ensure the thermostat is connected to the Wi-Fi network. |
| – Verify the strength and stability of the Wi-Fi signal. |
| – Reconfigure Wi-Fi settings if necessary. | |
| 4. Software or Firmware Errors | – Update the Nest Thermostat firmware to the latest version. |
| – Perform a factory reset and reconfigure the thermostat. |
| – Contact Nest support for further assistance. | |
| 5. Compatibility Problems | – Confirm the Nest Thermostat is compatible with the HVAC system. |
| – Check for any system updates or patches from Nest. |
| – Consult Nest compatibility documentation. | |
| 6. Sensor or Hardware Malfunction | – Inspect the thermostat for any physical damage. |
| – Check for sensor malfunctions or irregularities. | |
| – Replace or repair faulty hardware components. |
The E298 code on a Nest Thermostat may appear due to various reasons. Common causes include incorrect wiring, a missing C-wire connection, a tripped circuit breaker, or a blown fuse. To address these issues, you can try solutions like rewiring the thermostat, connecting a C wire, resetting tripped breakers, or replacing blown fuses. If you ever encounter the E298 error, follow the simple troubleshooting steps to ensure your Nest thermostat is receiving power and functioning properly.
Tripped Breakers
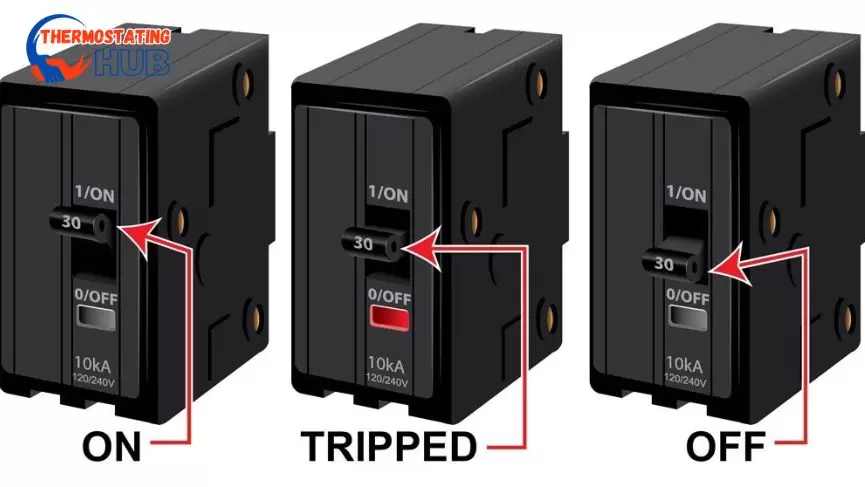
The E298 Error indicates a power-related problem, so it’s essential to verify that your system is indeed receiving power.
Inspect the switches for both the air handler and the outdoor unit. If these switches are in the “on” position but the system isn’t receiving power, examine the circuit breaker and reset any tripped breakers.
If both breakers and switches seem to be properly activated, it’s advisable to inspect the thermostat wiring as well.
Tripped breakers are like safety switches in your home’s electrical system. They can shut off power to a specific area when there’s too much electricity flowing through. If you suddenly lose power in a part of your home, check the breaker panel. A tripped breaker may be the culprit. Look for a switch that’s in the middle or off position and flip it back to the “on” position. This simple action can often restore power and solve the issue. Remember, safety first – if you’re unsure, it’s always a good idea to consult with a professional electrician.
Read also: How To Reset A Honeywell Thermostat Filter Indicator?
Incorrect Thermostat Wiring
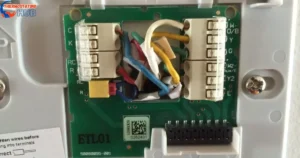
When encountering an E298 error on your thermostat, the initial step is to examine the wiring configuration. To assess the wiring configuration on your thermostat:
Navigate to Settings in Nest settings —> Equipment —> Wiring info
In this section, you will find the wires detected by the thermostat, as illustrated in the image below:
Examine the wires labeled R and C; do they display a grey color? Undetected wires are typically depicted in grey, whereas those successfully identified exhibit color.
Essentially
the grey appearance indicates that the wires are not transmitting voltage to your thermostat. Occasionally, even if wires are physically connected, they may go undetected, often due to loose connections.
If all wires are uniformly grey, it is essential to confirm that the entire system is receiving power. Check for any tripped circuit breakers as they could be a potential cause.
Incorrect thermostat wiring can cause problems with your heating and cooling system. If the wires are not connected properly, your thermostat may not communicate effectively with the HVAC system. This can lead to issues like the Nest thermostat displaying the E298 ‘No power’ code. To address this, check the wiring connections and ensure they match the recommended configuration for your thermostat model. If needed, consult the thermostat’s manual or seek professional assistance to correct any wiring errors.
Troubleshooting Incorrect Thermostat Wiring
- Turn off power to your HVAC system using a switch or by tripping the circuit breaker.
- Remove the thermostat from the wall by pulling it away from its base.
- Pull out each wire by pushing down on the connector and inspect each wire to ensure it is well-stripped and exposed at least ⅓ inches.
- Re-insert the wires into their respective connectors, ensuring they are fully seated and have proper contact with the thermostat terminals.
- Once all wires are inserted, put the thermostat back onto its base and turn on the power.
- Use your thermostat to navigate to equipment settings and check if the problem is resolved.
Your Thermostat Doesn’t Have The C Wire.
If the issue continues, examine your thermostat for a C wire. Should a C wire be present but remain unconnected, establish a connection by attaching it to the C connector. In numerous instances, when no wire is linked to the C connector, identify an unused wire; that particular wire is the one you should connect.
Note: Ensure to connect this wire to the C terminal on the furnace.
If there is no C terminal or an unused wire, you may need to install a Nest power connector. Installing the power connector is simpler than running an additional wire from the thermostat to the air handler, based on my personal experience.
A power connector transforms 4 wires into a 5-wire output, providing an extra wire for the C connector that runs to the thermostat.
Power connectors are readily available in major stores, and you can easily find one online for as low as $25. If you have a zone controller for your system, that’s where you should install it. Otherwise, install it at the air handler.
Alternatives
There are alternative solutions for addressing the C wire issue. One such method involves using the G-wire as a C wire, and it’s both quick and cost-free.
If your thermostat doesn’t have a C wire, it might face power challenges. The C wire, or common wire, is crucial for providing a continuous power supply to your thermostat. Without it, your thermostat might not function properly, leading to issues like disrupted heating or cooling. To resolve this, consider consulting a professional to install a C wire, ensuring consistent power for optimal thermostat performance.
Read also: Turn Off Temporary Hold On Honeywell Thermostat
Instructions On Using G Wire As C Wire On Nest
Step 1. While your thermostat is off the wall and the wiring is visible, remove the wire from the G connector and insert it into the C connector.
Step 2. Go to the air handler and make some changes there as well. Remove the G wire from the G terminal and insert it into the C terminal. Keep in mind that the fan won’t run when there is a call for cooling.
Step 3. To enable the fan to run when cooling is on, insert a jumper wire between the Y and the G terminal. This ensures that when cooling is activated, the fan runs simultaneously.
Blown Fuse
The role of fuses in HVAC systems is to safeguard electrical components against damage resulting from overcurrent conditions. This implies that fuses are susceptible to blowing out in the presence of voltage surges or when two or more wires make contact.
For individuals who enjoy do-it-yourself tasks, it is possible to utilize a multimeter to measure resistances across the 5 amp fuses located on the control board. Replacing blown fuses is a straightforward and cost-effective solution to address the issue at hand.
A blown fuse occurs when there is too much electrical current flowing through a circuit, causing the fuse to melt or break. It acts as a safety device to protect electrical systems from damage or fire. When a fuse blows, it interrupts the electrical flow, preventing potential harm. To fix it, you need to replace the blown fuse with a new one of the same rating. Always follow safety precautions and consult a professional if needed.
Final Thoughts
Resolving the E298 ‘No Power’ code on your Nest thermostat is within easy reach. This article has illuminated common culprits such as incorrect wiring, missing C-wire connections, tripped breakers, or blown fuses.
The good news is there are solutions at your fingertips. Whether it’s rewiring the thermostat, establishing a C-wire connection, resetting breakers, or replacing fuses, these straightforward fixes can empower you to regain control of your Nest thermostat’s power supply.
By following the provided troubleshooting steps, you can swiftly address the issue, ensuring your Nest thermostat operates seamlessly once again. Embrace the simplicity of these solutions and enjoy the uninterrupted functionality of your smart home device.
Thank you for taking the time to read this article! If you have any additional questions or need further assistance, please don’t hesitate to ask. I appreciate your engagement.

I’m Justin Taylor, your HVAC aficionado at thermostatinghub.com. I’m not just a writer; I’m your problem-solving partner for all things thermostat-related. Join me on my blog for stories that unravel the mysteries of heating and cooling. Let’s turn your HVAC puzzles into tales of comfort and control!